Introducing the GC dual analog focus/motor controller
- Controls 2 motors
- Battery powered by 4 x AA
Voltage boosted to 12V to drive the motors
- PWM based motor control:
Three different ranges of PWM algorithms inside provide for extremely fine to very fast motor control in smooth continuous real time response to speed selector.
- PC interface supported via USB to TTL serial cable which is readily available.
- ASCOM driver
Allows ASCOM handbox control of both motors and ASCOM application control of primary focus motor.
Quickstart guide: Click here

Figure 1 – Buttons and jacks
Figure 1 shows the jack that is associated with the direction buttons
Note: Using the buttons only one motor may be moved at a time.
Pressing a direction, holding and then pressing the other direction button will kick the motor into ‘fast’ mode. Release of the second button drops back to speed selected by speed selector.
The end panel

Figure 2
Figure 2 shows the:
1) Twist knob controlling speed for given button set
2) Power on LED
3) On/Off switch
4) PC interface jack (do –not- plug focus motor into this jack!)
In the view above, for speed control:
twisting clockwise = slower,
counterclockwise = faster.
When unit is switched off it is normal for the LED to slowly dim after unit is powered off
Changing the battery

Figure 3
Figure 3 shows how to open the battery cover to change batteries.
Press close to the edge shown in the red line, cover will tilt in. Change batteries, replace cover by inserting the edge slightly at the red line edge, press opposite end down and slide towards the right till cover pops in.
RigelSys nFOCUS mode:
The controller provides for two modes of operation
1) The speed control dials operate independently of each other
2) The speed control dials are inter dependent with one setting the pulse width and other setting the duty cycle
To switch between modes, hold down first the top button shown in figure 1 and then press both the lower two buttons and then the middle button, with all four buttons pressed at the same time.
The only requirement for switching modes is the top button first. If the middle button is pressed before the bottom two buttons the unit will go into fast mode for the first motor until the last2 buttons are pressed, again end up with all buttons pressed at same time.
PC interface
explained:
The PC interface is meant to use the FTDI TTL-232R-5V-AJ cable.
See: http://www.ftdichip.com/Support/Documents/DataSheets/Cables/DS_TTL-232R_CABLES.pdf
The cable itself is available from various vendors:
http://www.mouser.com/Search/ProductDetail.aspx?qs=OMDV80DKjRpyBfF7K%252bVrRw%3d%3d
http://www.dontronics-shop.com/ftdi-ttl-232r-3v3aj-usb-to-serial-ttl-level-converter-cable.html
and the manufacturer:
http://www.ftdichip.com/Products/Cables/USBTTLSerial.htm
Any serial TTL 5V level interface will work that matches the pinout of the jack.
Specs are : 9600/8/N/1
Pinout of the jack on the unit is:
Ring – Ground
Middle – Tx to PC from unit
Tip: Tx to unit from PC
The API supported is:
Command supported:
0x6 'n' analog focus controller
0x7 'D' - dual analog
'S' Motor 0: 0 if not moving, 1 if moving
's' Motor 1: 0 if not moving, 1 if moving
:FDRXXX# Focus in dir D at rate R for XXX steps
D = 0 = in, 1 = out
R = 0 = standard as set by :CO, :CF
R = 1 = fast mode
:RO Read motor 1 focus on time, returns XXX in ms
:RF Read motor 1 focus off time, returns XXX in ms
:RS Read motor 1 fast wait, always returns 010, preserved for gcusb-nfocus driver compatibility
:RT Read motor 1 temperature, always returns -888, reserved for future expansion
:RN Read mode, returns 0 = dual analog, 1 = nFOCUS
:rO Read motor 2 focus on time, returns XXX in ms
:rF Read motor 2 focus off time, returns XXX in ms
:rS Read motor 2 fast wait, always returns 010, preserved for gcusb-nfocus driver compatibility
:rT Read motor 2 temperature, always returns -888, reserved for future expansion
NO :rN command
:COXXX# Set motor 1 On time
:CFXXX# Set motor 1 off time
:CSXXX# Set motor 1 fast mode wait time, ignored, preserved for compatibility with gcusb-nfocus driver
:CNX# Configure mode, 0 = dual analog, 1 = nFOCUS
:cOXXX# Set motor 2 On time
:cFXXX# Set motor 2 off time
:cSXXX# Set motor 2 fast mode wait time, ignored, preserved for gcusb-nfocus driver compatibility
NO :cNX# command
ASCOM driver
Download ASCOM driver V5.0.1, click here
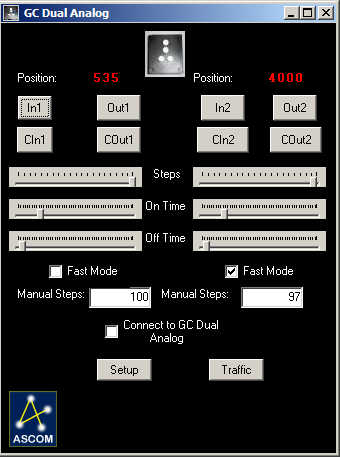
Below is a screenshot of the ASOM driver ‘handbox’

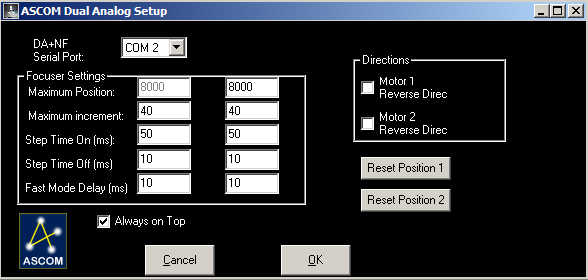
And the ASCOM driver setup screen:

What’s inside:
The stuffed PCB (minus the PC interface jack)
Controlled by PIC 16F688 in the upper left with isolated control signals by opto couplers (right of top buttons) to hexfets in an h-bridge configuration for each motor (far right and lower right). Left of center is the 4V-6V to 12V boost converter.
